My little corner of the web to share my card creations and hopefully inspire others to create. We all need a calming outlet in this hectic world, so do what you love and love what you do, and start creating!
Welcome back everyone! I have been taking a bit of a break for a few reasons, but slowly moving back into work mode.
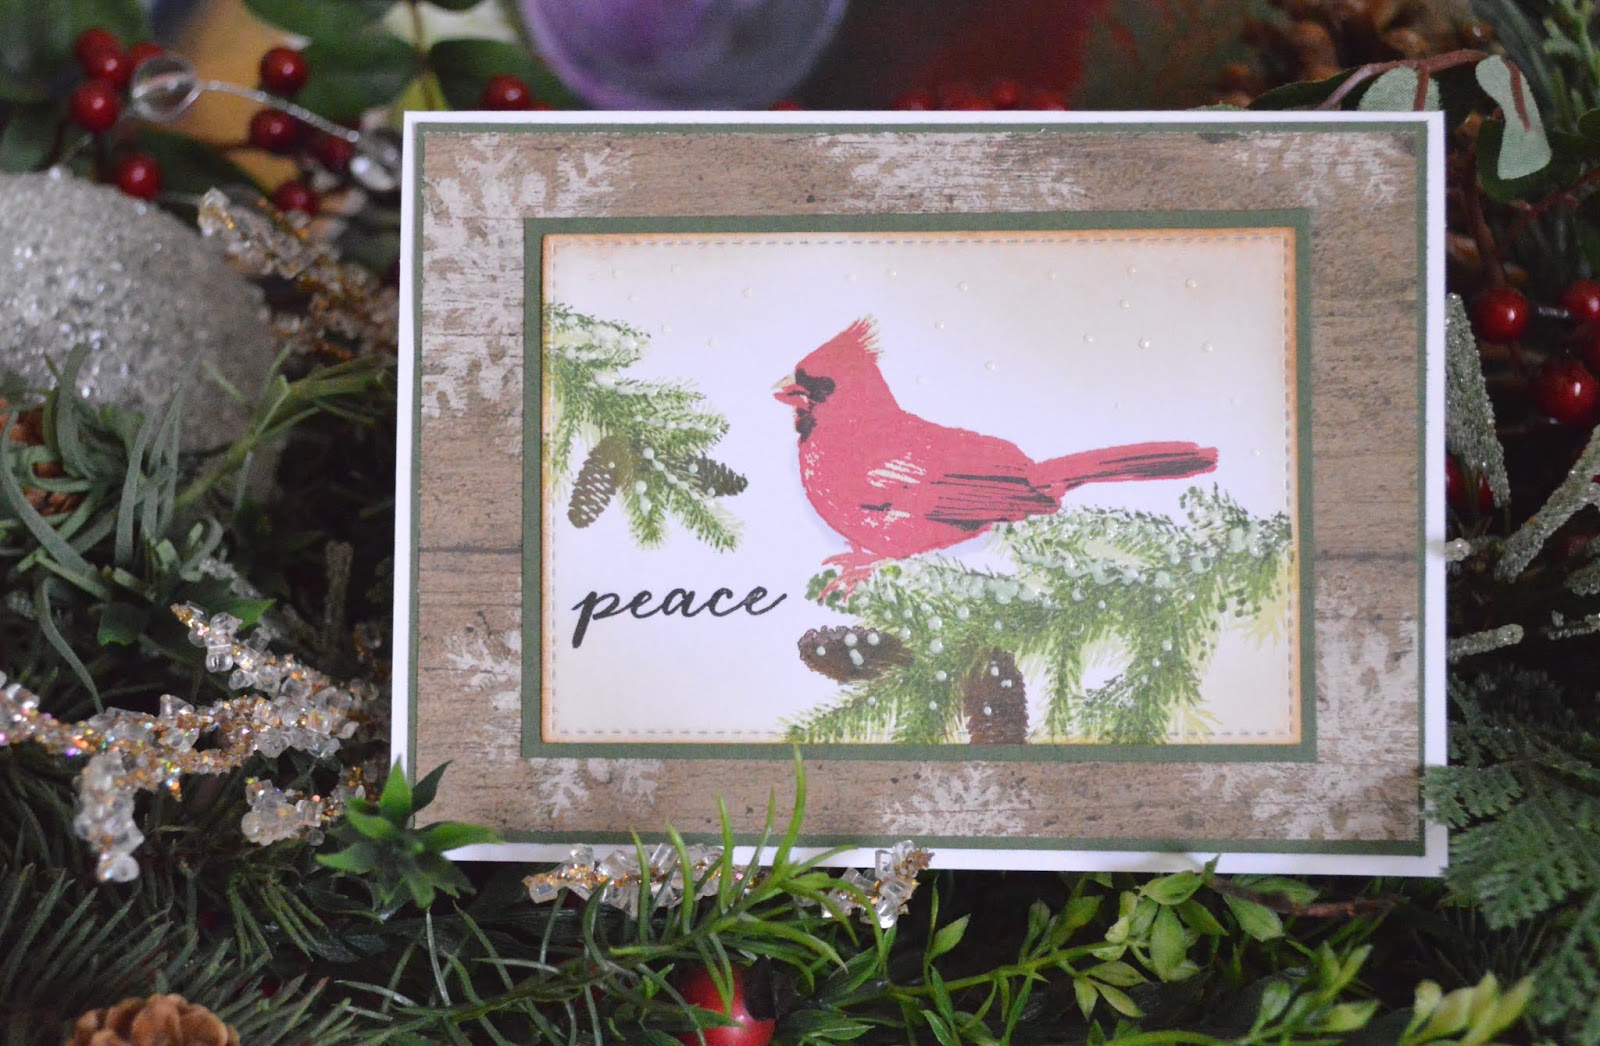
Today, I am going to feature a great company out of California, called Kitchen Sink Stamps. I came to know of them this past summer while attending a stamping convention, called Junkie
Fest, which was hosted by the Stamp Junkies, an amazing online Facebook group. Kitchen Sink Stamps has hundreds of designs and specialize in multi step clear stamps, where the images look very real. If you haven't checked them out....get on it!
Anyways, I have created several of these cardinal cards to use as Thank You notes that I am sending out this week. I had surgery one week before Christmas, and many, many people did wonderful and kind things to help my family and I out this last while, and I certainly wanted to create cards to share my gratitude.
I kept all the cards similar as I wanted to get about 25 done in a short time while I was able to sit up (on bed rest...flat) and created them over 3 times in just over an hour. So not bad!
I started with an A2 white card base, then matted with olive green cardstock and a wood grain, snowflake patterned paper, all from Recollections. Then using Neenah white cardstock, I cut a bunch of mats at 4" x 2 3/4" and matted them again on the green.
Image from Kitchen Sink Stamp
Then it was time to load my MISTI and get stamping! I started with the branches. I stamped the first layer using Versafine 'New Sprout', second layer is 'Olympia Green', followed by 'Vintage Sepia' for the pine cone layer.
For the cardinal, I used Rangers 'Antique Linen' first, followed by Lawn Fawn 'Lobster', then Hero Arts 'Red Midtone'. Last layer for the beak and a touch of detail is Versafine 'black onyx'
The cards received different sentiments on the outside, yet all read Thank you on the inside.
This "Peace" stamp shown here, is by Hero Arts.
After the cardinal was done, I added a very slight shadow under his belly with a C3 Copic marker.
For just a bit more depth and keeping it easy, I went around the edges with a foam piece and a bit more antique linen ink.
Finishing touch was the random snow using Nuvo drops in 'white'
I hope you enjoyed today's quick card and please do head over to Maria's wonderful company Kitchen Sink Stamps. She has great designs, and a sale on many sets right now!
Remember...be creative, think of others and kindness always matters.
There was tons of great product in the box, and it made it easy for me to create a huge batch of cards....31 in fact! I won't share them all, but certainly enough to get you inspired and digging into your kit.
Card One:
For the first card, I kept it nice and simple. I absolutely loved this plaid paper, so I knew I wanted it to be the focal point of this card.
I started with an A2 size card base in cream, and matted the next two layers 1/8 inch smaller than the next. I then cut a 1 inch strip of green and matted the light purple on top and wrapped a little bit of the twine around it, before adhering to the card. Next came the 2 inch circle for the sentiment. I used the 'thank you' die that was included in the set, and cut it out of a scrap of white to make it pop.
Card Two:
The second card, is an A2 sized card and once again, simple in design. I used the dark grey cardstock from the kit and matted with a piece of white paper I had in my stash already. I wanted to draw out the brightness in the polka dots of the next paper. For the embellishment, I used five of the little triangles from the kit, to create a sweet little banner across the corner and tied them off with twine bows.To finish off, I used the Thank You sticker in the opposite corner.
Card Three:
For this card, I used the gorgeous butterfly paper. I so often gravitate to butterflies on sympathy cards, not sure why, just one of my things!
I started with an A2 size card and matted with the purple linen paper from the pack, then the butterfly one. Before adhering to the card base, I added a piece of sheer ribbon from my stash around it. Next layer is 3x4 and matted the same, but raised up with foam squares to add detail. I felt a little bow would add a touch of elegance, so I slipped it to the side. Lastly, I stamped a simple sentiment, using a Hero Arts stamp, and attached it across the front. Even with the foam and bow, it is still low profile enough to go through the post no problem.
Card Four:
For this card, I kept it simple and great for any occasion really. I started with this lovely little floral print paper as my base, and wanted to draw out the green a bit more, so I grabbed a leftover Christmas paper that match perfectly and matted them into a 5x7 card. Next was the banner down the side with a pink from the kit, matted onto more green. I had a little remnant of the twine leftover and just the perfect size to add on. I used one of the awesome sentiment stamps from the kit and stamped in black, cut it down to a 2 inch square and matted once again with green. The bird sticker and few drops of Nuvo in Plum Pudding, rounds out card 4.
Card 5:
This card might be my favourite of all! I just loved the colour and texture, so much. For this one,I knew I wanted the lace to be the feature, so I decided go big or go home, and cover the front in it!. I took a 3x4 inch scrap of cardstock and chose two different lace patterns from the kit, and just cut a bunch of strips a tad wider than the paper and put them in a pile. From there, I simply adhered them to the 3x4 piece, by alternating the white and ivory until it was covered. I used 11 pieces in total.
I knew I was going to use the purple flowers, so I found a purple scrap on my desk that matched really well and mounted it to that. From there, I glued it to an A2 card base and made my floral focal. I pulled the leaves off of another flower just to fill the cluster up a bit more, and stuck it all down with sticky dots. I used the Thinking of You sticker and two leaf stickers as well. To finish, I tucked in a couple pearls.
Card 6:
Another simple card, where all the product comes from the kit. A2 card base cut from the white cardstock, followed by two pieces of patterned paper for matting. I tucked a strip of lace around the paper before adhering to the base. I really loved this glossy pink striped paper, so just left it as it was and matted on a white back. Loved the Happy Birthday sticker to finish off. Like I said....quick and easy!
Card 7:
So this card started out with one idea, yet ended with another! Anyone else ever have that?
I began with a square base of 5.5 x 5.5 inches for my card base, in white cardstock. Next I grabbed the grey cardstock from the kit for stenciling the butterflies.
I used the butterfly stencil, and inked over the top with versamark ink, then added the LFL ivory embossing powder and heat set. Once this was cooled, I added their little bodies using the stamp set. I love this stamp and stencil duo, as there are so many combinations to make from them. I initially was going to mat in the silver cardstock that came in the kit, but I found on the grey paper the ivory read more as a gold, so went with that instead. Added some foam tape behind and another layer of grey. To finish off add brightness, I added many drops of white gel pen all over.
Card 8:
This beauty has lots of detail and one of my favourites as well.
I choose two patterned papers from the kit, and went about distressing the sides by sanding and addding ink. From there, I used a dollie and touched it in a few spots with gold ink splatter, and cut in half. To balance the gold, I ran a strip along the side, as well as a strip of lace. From the kit, I used the paper flower and On Your Special Day sticker, and pearls. I wanted to add a bit more, so I cut few leaves out and wrinkled them up before gluing in. Last but not least, I cut two filigrees from the same matting paper, and tucked them in. Both the leaf and swirls are from Gina K Designs
Card 9:
When you have a Love from Lizi kit, you always have to make a shaker card, because the sequins included are so beautiful! They really do capture all the colours of the kit so well.
I loved this dainty yellow and blue floral paper, so much, I wish I had more of it! I started with the two mats attached to a 5x7 card front, then set about making a shaker piece. I stamped the image from the set on white cardstock, long with a few small butterflies. Since the paper was alcohol ink friendly,I added a touch of yellow to each with a Y23 Copic marker. I had already cut a frame out of the blue cardstock before adhering , so just added some acetate for the window. Sequins next, then foam, then all sandwiched together on the card front. Trimmed up the frame using the LFL Peel offs (love those) as they match so well, and add more sparkle. I stamped and heat set one more butterfly from the kit, used Y11 and Y23 Copic to color, then fussy cut him out for the corner.
Card 10:
For card 10, we finish off with another simple design using kit contents. A2 card base, mattd with two layers of pattern paper. Before adhering, I added a matching lace piece. I die cut an oval from another pattern, and pulled it all together with the two little stickers. Great card to have on hand for many different occasions.
I made several more cards, I haven't shown individual , but here is a snippet of the sets. I created two box sets, 6 cards in each box. One is all Thank you cards and the other is an assortment.
I hope you found some inspiration within my blog today, and are able to dig into your LFL kit when it arrives at your door!
I also want to take a moment and send a huge Thank You out to Love from Lizi, for inviting me to be a guest designer this month. I always love working with your product Lizi, and all the great stash building staples that are in there!
Head on over to Love From Lizi, to check out her shop